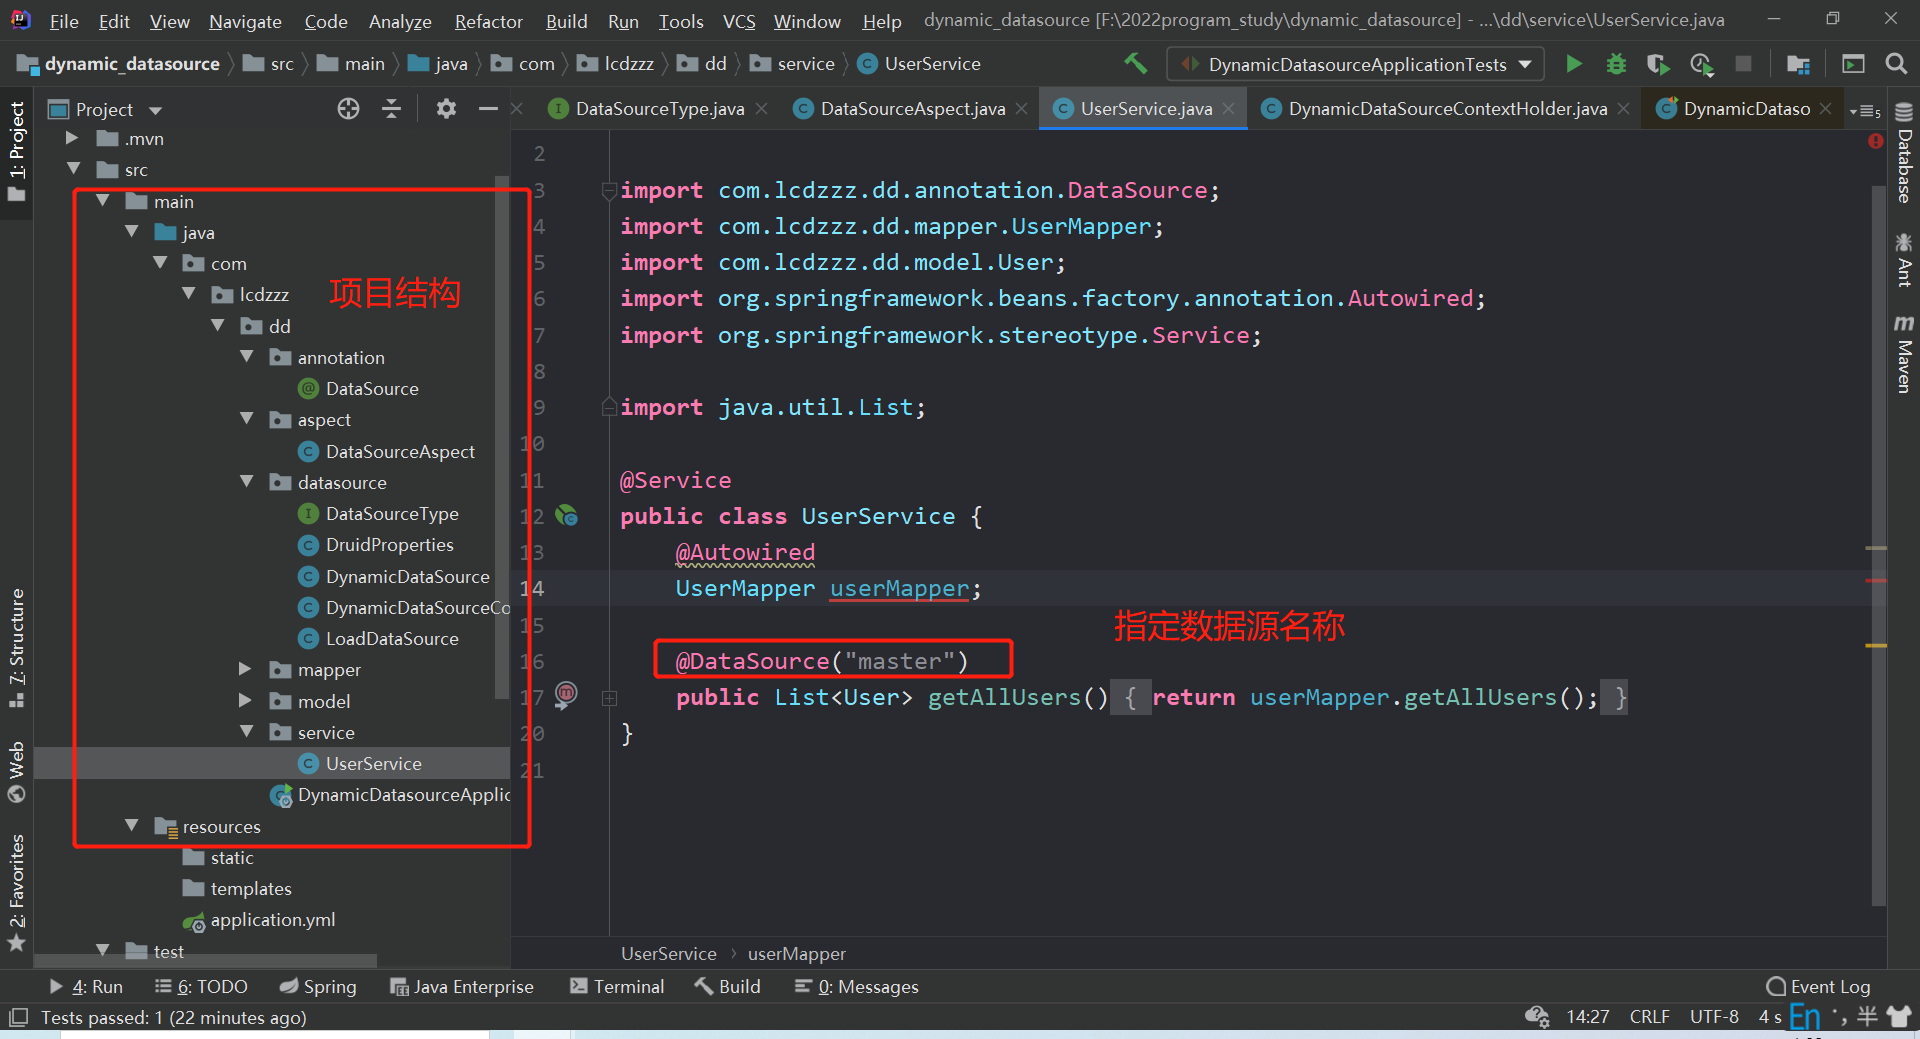
项目地址
准备
依赖:
配置文件
1
2
3
4
5
6
7
8
9
10
11
12
13
14
15
16
17
18
19
20
21
22
23
24
25
26
27
28
29
30
31
32
33
34
35
36
37
38
39
40
41
42
43
44
45
46
47
48
49
50
51
52
53
54
55
56
|
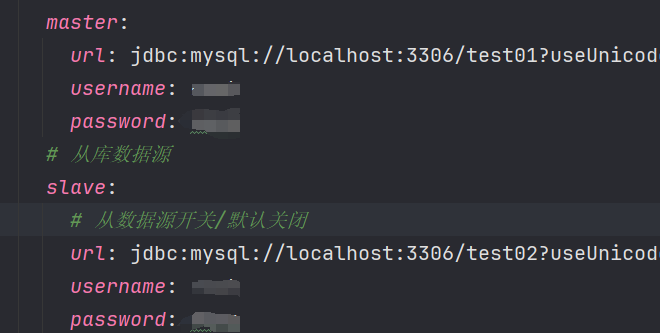
spring:
datasource:
type: com.alibaba.druid.pool.DruidDataSource
driverClassName: com.mysql.cj.jdbc.Driver
ds:
master:
url: jdbc:mysql://localhost:3306/test01?useUnicode=true&characterEncoding=utf8&zeroDateTimeBehavior=convertToNull&useSSL=true&serverTimezone=GMT%2B8
username: root
password: wqeq
slave:
url: jdbc:mysql://localhost:3306/test02?useUnicode=true&characterEncoding=utf8&zeroDateTimeBehavior=convertToNull&useSSL=true&serverTimezone=GMT%2B8
username: root
password: wqeq
initialSize: 5
minIdle: 10
maxActive: 20
maxWait: 60000
timeBetweenEvictionRunsMillis: 60000
minEvictableIdleTimeMillis: 300000
maxEvictableIdleTimeMillis: 900000
validationQuery: SELECT 1 FROM DUAL
testWhileIdle: true
testOnBorrow: false
testOnReturn: false
webStatFilter:
enabled: true
statViewServlet:
enabled: true
allow:
url-pattern: /druid/*
login-username: tienchin
login-password: 123456
filter:
stat:
enabled: true
log-slow-sql: true
slow-sql-millis: 1000
merge-sql: true
wall:
config:
multi-statement-allow: true
|
步骤
- 自定义一个注解@DataSource,将来可以将该注解加service层在方法或者类上面,表示方法或者类中的所有方法都使用某一个数据源
- 对于第一步,如果某个方法上面有@DataSource注解,那么就将该方法需要使用的数据源名称存入ThreadLocal。
- 自定义切面,在切面中解析@DataSource注解的时候,将@DataSource注解所标记的数据源存入到ThreadLocal中。
- 最后,当Mapper执行的时候,需要DataSource,他会自动去AbstractRoutingDataSource类中查找需要的数据源,我们只需要在AbstractRoutingDataSource中返回ThreadLocal中的值
综上:用@DataSource注解,在一个方法或者一个类上面,去标注你想使用哪个数据源。然后将来在这个AOP(切面)里面解析这个注解,把想使用的数据源的名字找出来,存在ThreadLocal里面去。当以后真正需要用的时候,人家会自动的从AbstractRoutingDataSource里面去查找需要的数据源。
所以,我们要做的就是:重写(自己写一个类继承)AbstractRoutingDataSource,然后在它的方法里面去返回ThreadLocal里边所存储的数据源的名字。最后它会根据名字找到对应的数据源
步骤1:@DataSource
自定义一个注解@DataSource,将来可以将该注解加service层在方法或者类上面,表示方法或者类中的所有方法都使用某一个数据源
1
2
3
4
5
6
7
8
9
10
| import java.lang.annotation.ElementType;
import java.lang.annotation.Retention;
import java.lang.annotation.RetentionPolicy;
import java.lang.annotation.Target;
@Retention(RetentionPolicy.RUNTIME)
@Target({ElementType.TYPE,ElementType.METHOD})
public @interface DataSource {
String value();
}
|
步骤2:DynamicDataSourceContextHolder
对于第一步,如果某个方法上面有@DataSource注解,那么就将该方法需要使用的数据源名称存入ThreadLocal。
1
2
3
4
5
6
7
8
9
10
11
12
13
14
15
16
17
18
19
20
21
|
public class DynamicDataSourceContextHolder {
private static ThreadLocal<String> CONTEXT_HOLDER = new ThreadLocal<>();
public static void setDataSourceType(String dsType){
CONTEXT_HOLDER.set(dsType);
}
public static String getDataSourceType(){
return CONTEXT_HOLDER.get();
}
public static void clearDataSourceType(){
CONTEXT_HOLDER.remove();
}
}
|
步骤3:DataSourceAspect
自定义切面,在切面中解析@DataSource注解的时候,将@DataSource注解所标记的数据源存入到ThreadLocal中。
用到了切面,自然需要引入AOP的依赖
1
2
3
4
| <dependency>
<groupId>org.springframework.boot</groupId>
<artifactId>spring-boot-starter-aop</artifactId>
</dependency>
|
【注】学习一下,如何拿到注解里的值
1
2
3
4
5
6
7
8
9
10
11
12
13
14
15
16
17
18
19
20
21
22
23
24
25
26
27
28
29
30
31
32
33
34
35
36
37
38
39
40
41
42
43
44
45
46
47
48
49
50
51
52
53
54
55
56
57
| import com.lcdzzz.dd.annotation.DataSource;
import com.lcdzzz.dd.datasource.DynamicDataSourceContextHolder;
import org.aspectj.lang.ProceedingJoinPoint;
import org.aspectj.lang.annotation.Around;
import org.aspectj.lang.annotation.Aspect;
import org.aspectj.lang.annotation.Pointcut;
import org.aspectj.lang.reflect.MethodSignature;
import org.springframework.core.annotation.AnnotationUtils;
import org.springframework.stereotype.Component;
@Component
@Aspect
public class DataSourceAspect {
@Pointcut("@annotation(com.lcdzzz.dd.annotation.DataSource) || @within(com.lcdzzz.dd.annotation.DataSource)")
public void pc(){
}
@Around("pc()")
public Object around(ProceedingJoinPoint pjp){
DataSource dataSource=getDataSource(pjp);
if (dataSource!=null){
String value=dataSource.value();
DynamicDataSourceContextHolder.setDataSourceType(value);
}
try {
return pjp.proceed();
} catch (Throwable throwable) {
throwable.printStackTrace();
} finally {
DynamicDataSourceContextHolder.clearDataSourceType();
}
return null;
}
private DataSource getDataSource(ProceedingJoinPoint pjp) {
MethodSignature signature = (MethodSignature) pjp.getSignature();
DataSource annotation = AnnotationUtils.findAnnotation(signature.getMethod(), DataSource.class);
if (annotation!=null){
return annotation;
}
return AnnotationUtils.findAnnotation(signature.getDeclaringType(),DataSource.class);
}
}
|
步骤4
最后,当Mapper执行的时候,需要DataSource,他会自动去AbstractRoutingDataSource类中查找需要的数据源,我们只需要在AbstractRoutingDataSource中返回ThreadLocal中的值
DruidProperties
1
2
3
4
5
6
7
8
9
10
11
12
13
14
15
16
17
18
19
20
21
22
23
24
25
26
27
| @ConfigurationProperties(prefix ="spring.datasource" )
public class DruidProperties {
private String type;
private String driverClassName;
private Map<String,Map<String,String>> ds;
private Integer initialSize;
private Integer minIdle;
private Integer maxActive;
private Integer maxWait;
public DataSource dataSource(DruidDataSource druidDataSource){
druidDataSource.setInitialSize(initialSize);
druidDataSource.setMinIdle(minIdle);
druidDataSource.setMaxActive(maxActive);
druidDataSource.setMaxWait(maxWait);
return druidDataSource;
}
|
LoadDataSource
定义一个类去加载所有的数据源
1
2
3
4
5
6
7
8
9
10
11
12
13
14
15
16
17
18
19
20
21
22
| @Component
@EnableConfigurationProperties(DruidProperties.class)
public class LoadDataSource {
@Autowired
DruidProperties druidProperties;
public Map<String, DataSource> loadAllDataSource(){
Map<String,DataSource> map=new HashMap<>();
Map<String, Map<String, String>> ds = druidProperties.getDs();
try {
Set<String> strings = ds.keySet();
for (String key : strings) {
map.put(key, druidProperties.dataSource((DruidDataSource) DruidDataSourceFactory.createDataSource(ds.get(key))));
}
} catch (Exception e) {
e.printStackTrace();
}
return map;
}
}
|
DynamicDataSource【核心!】
当Mapper执行的时候,需要DataSource,他会自动去AbstractRoutingDataSource类中查找。这里继承的就是AbstractRoutingDataSource类
框架会调用determineCurrentLookupKey来获取数据源的名称,并且这个方法获取到的数据,会存到DynamicDataSourceContextHolder里面去。
因此,如果设计一个按钮,可以把DynamicDataSourceContextHolder里的数据修改了,就可以达到手动在网页上切换数据源的功能,请看一级标题:【手动实现网页上切换数据源】
1
2
3
4
5
6
7
8
9
10
11
12
13
14
15
16
17
18
19
20
21
22
| @Component
public class DynamicDataSource extends AbstractRoutingDataSource {
public DynamicDataSource(LoadDataSource loadDataSource) {
Map<String, DataSource> allDs = loadDataSource.loadAllDataSource();
super.setTargetDataSources(new HashMap<>(allDs));
super.setDefaultTargetDataSource(allDs.get(DataSourceType.DEFAULT_DS_NAME));
super.afterPropertiesSet();
}
@Override
protected Object determineCurrentLookupKey() {
return DynamicDataSourceContextHolder.getDataSourceType();
}
}
|
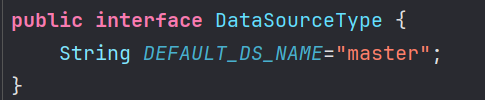
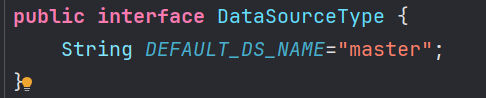
DataSourceType
把默认的数据源名称设置为常量
1
2
3
| public interface DataSourceType {
String DEFAULT_DS_NAME="master";
}
|
测试
实现准备两个数据源【方便起见就是两个数据库,名为test01和test02】
最后再测试类中使用测试,代码就是常见的mapper中写sql语句,serivce层调用,最后测试类使用service层的方法测试。
测试结果:不同名称的数据源,会查找对应不同的数据库,内容也有所不同
sql文件如下,意思意思
1
2
3
4
5
6
7
8
9
10
11
12
13
14
15
16
17
18
19
20
21
22
|
SET NAMES utf8mb4;
SET FOREIGN_KEY_CHECKS = 0;
DROP TABLE IF EXISTS `user`;
CREATE TABLE `user` (
`id` int(0) NOT NULL,
`username` varchar(255) CHARACTER SET utf8mb4 COLLATE utf8mb4_general_ci NULL DEFAULT NULL,
`age` int(0) NULL DEFAULT NULL,
PRIMARY KEY (`id`) USING BTREE
) ENGINE = InnoDB CHARACTER SET = utf8mb4 COLLATE = utf8mb4_general_ci ROW_FORMAT = Dynamic;
INSERT INTO `user` VALUES (1, 'lcdzzz', 22);
SET FOREIGN_KEY_CHECKS = 1;
|
总结
自定义数据源的使用分为两种情况
用@DataSource注解
- @DataSource 没有参数,默认用下面定义的
不用@DataSource注解
默认使用master
不用@DataSource,和用了但是没有加参数,两者都是“默认”,但是在逻辑是有区别
ps:idea 导出项目结构树:
- 输入命令:
tree >> E:\workTreeTemp\tree.txt
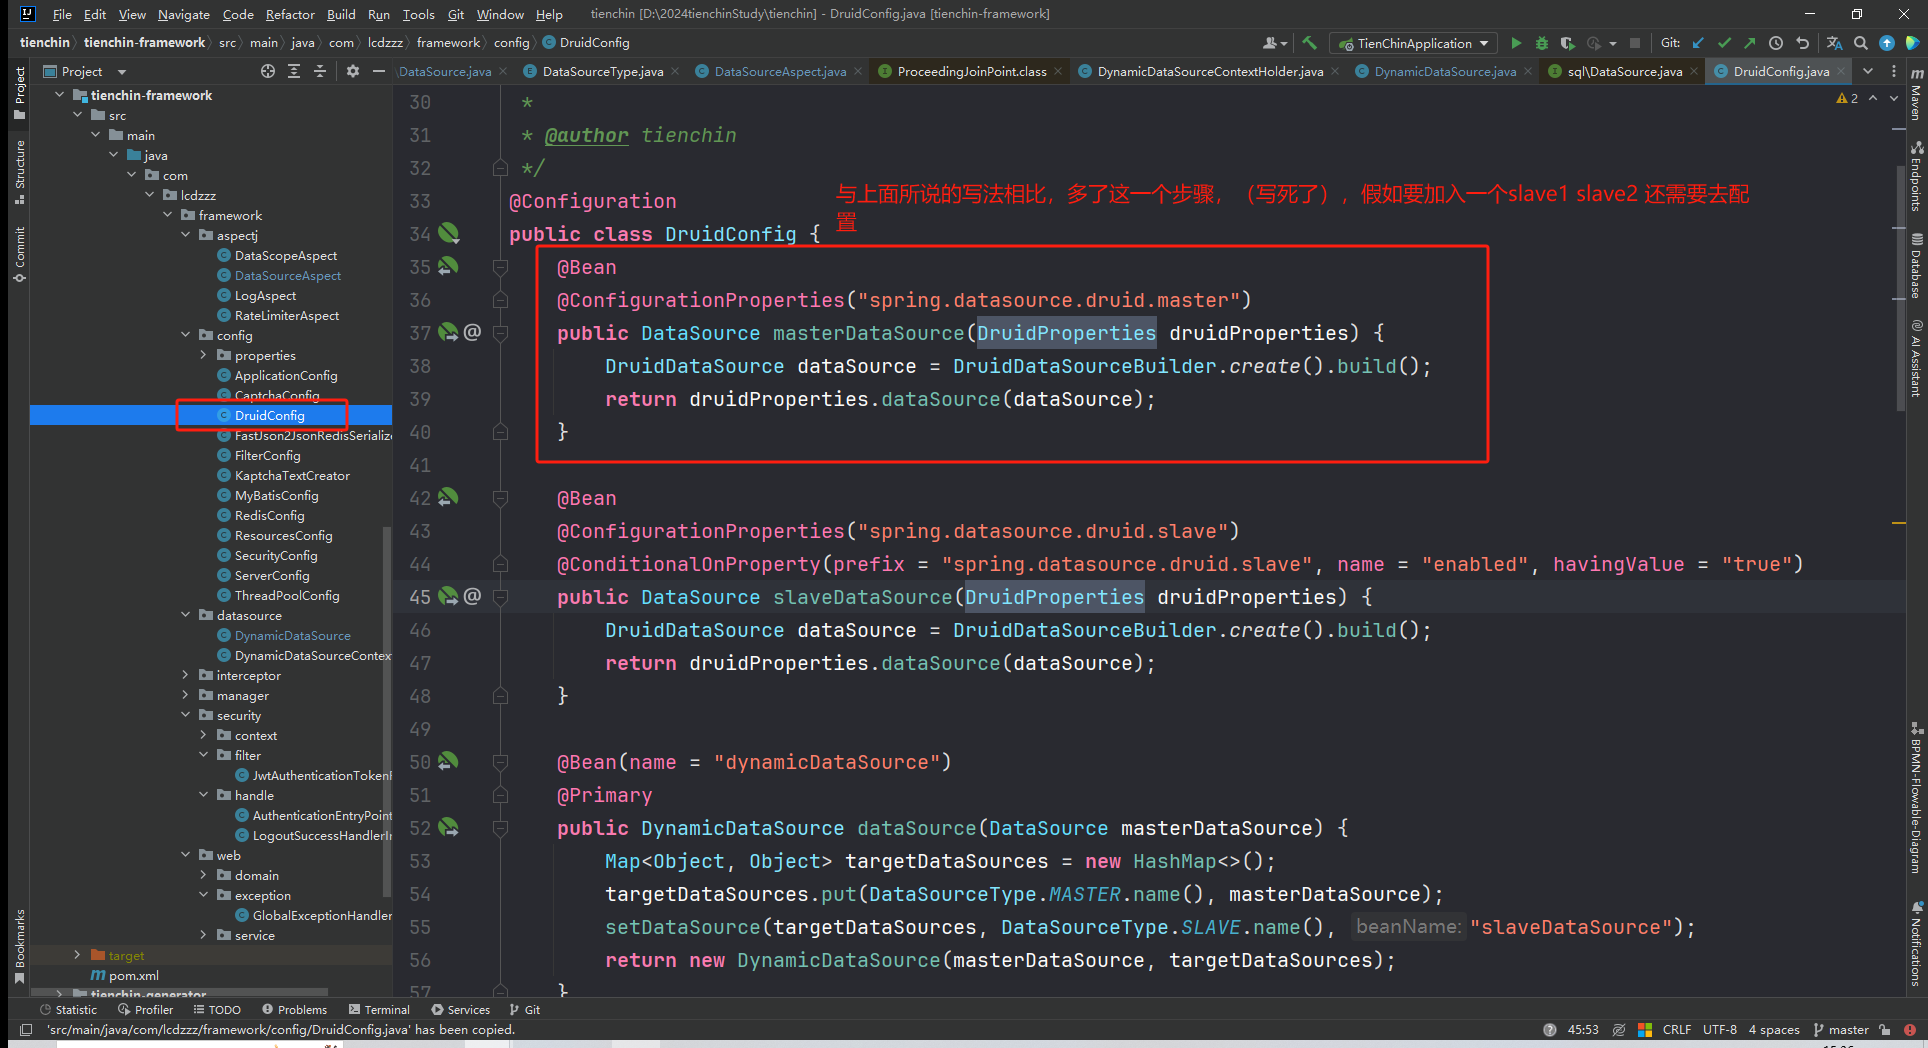
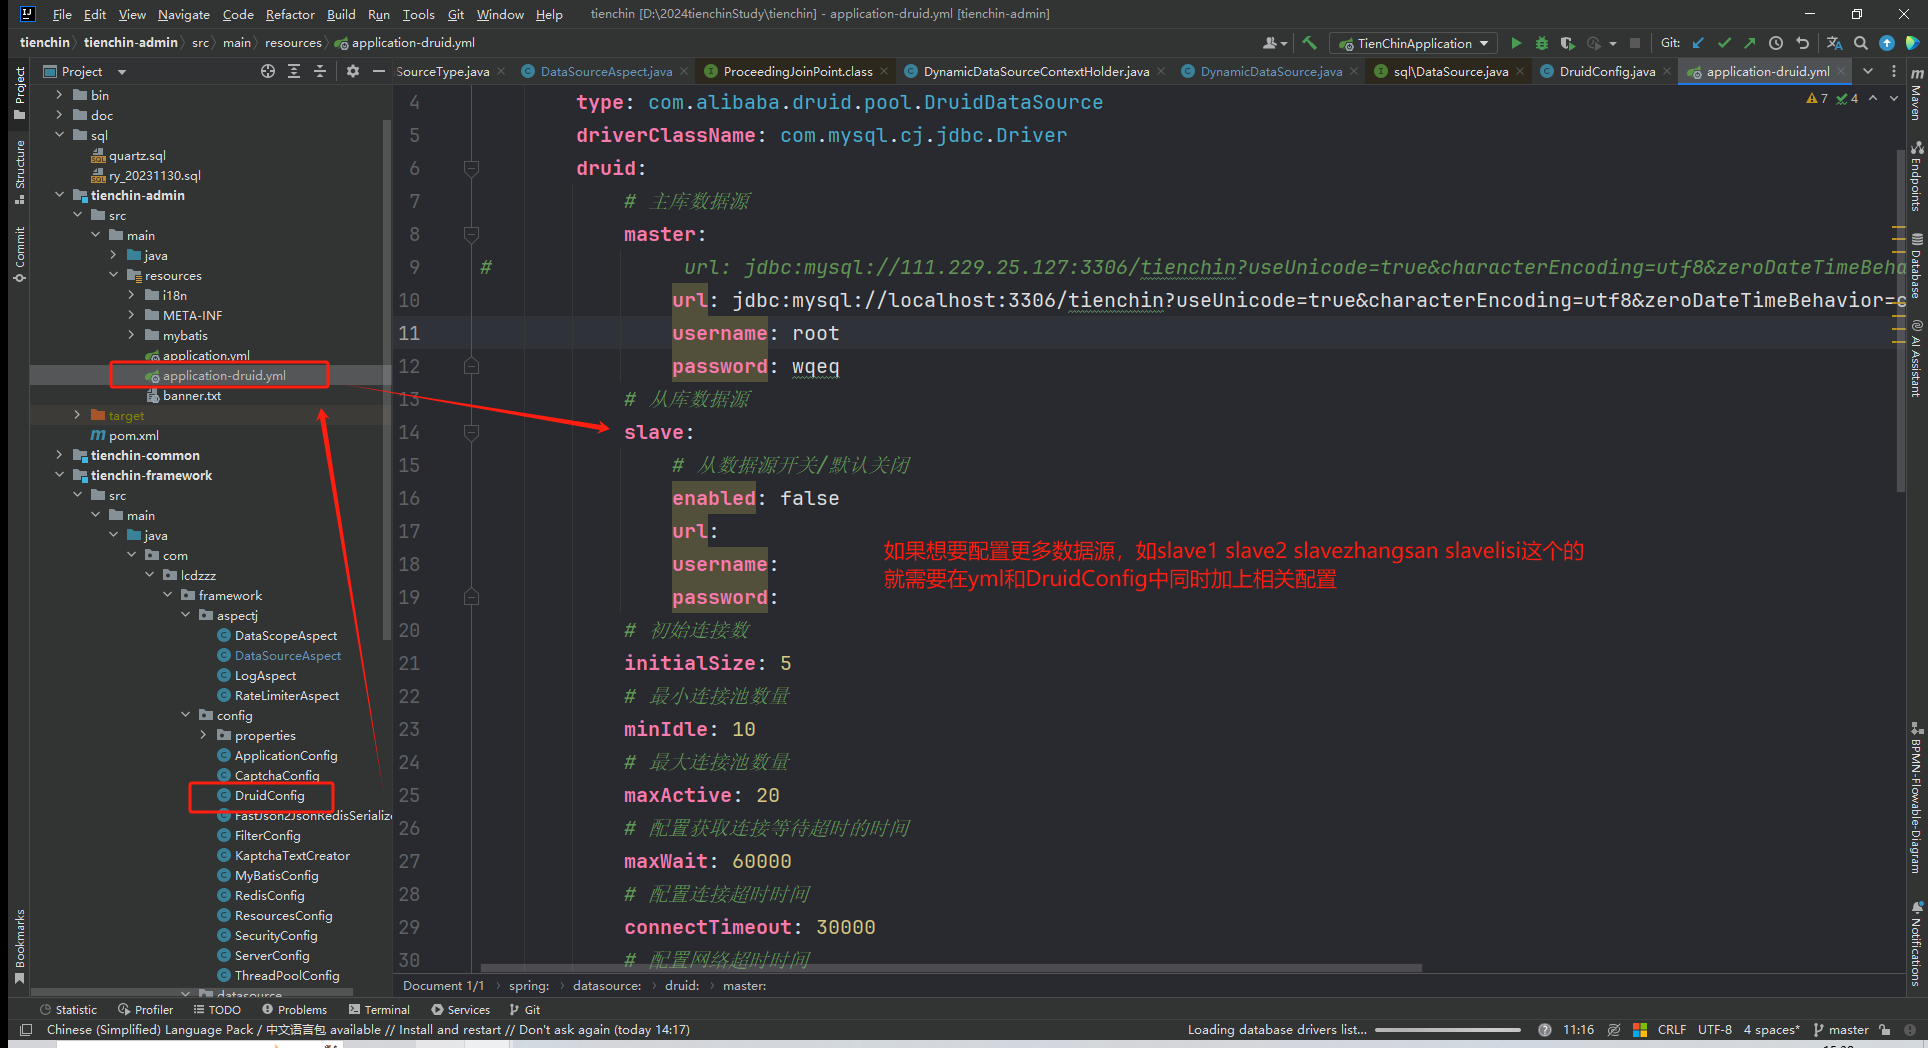
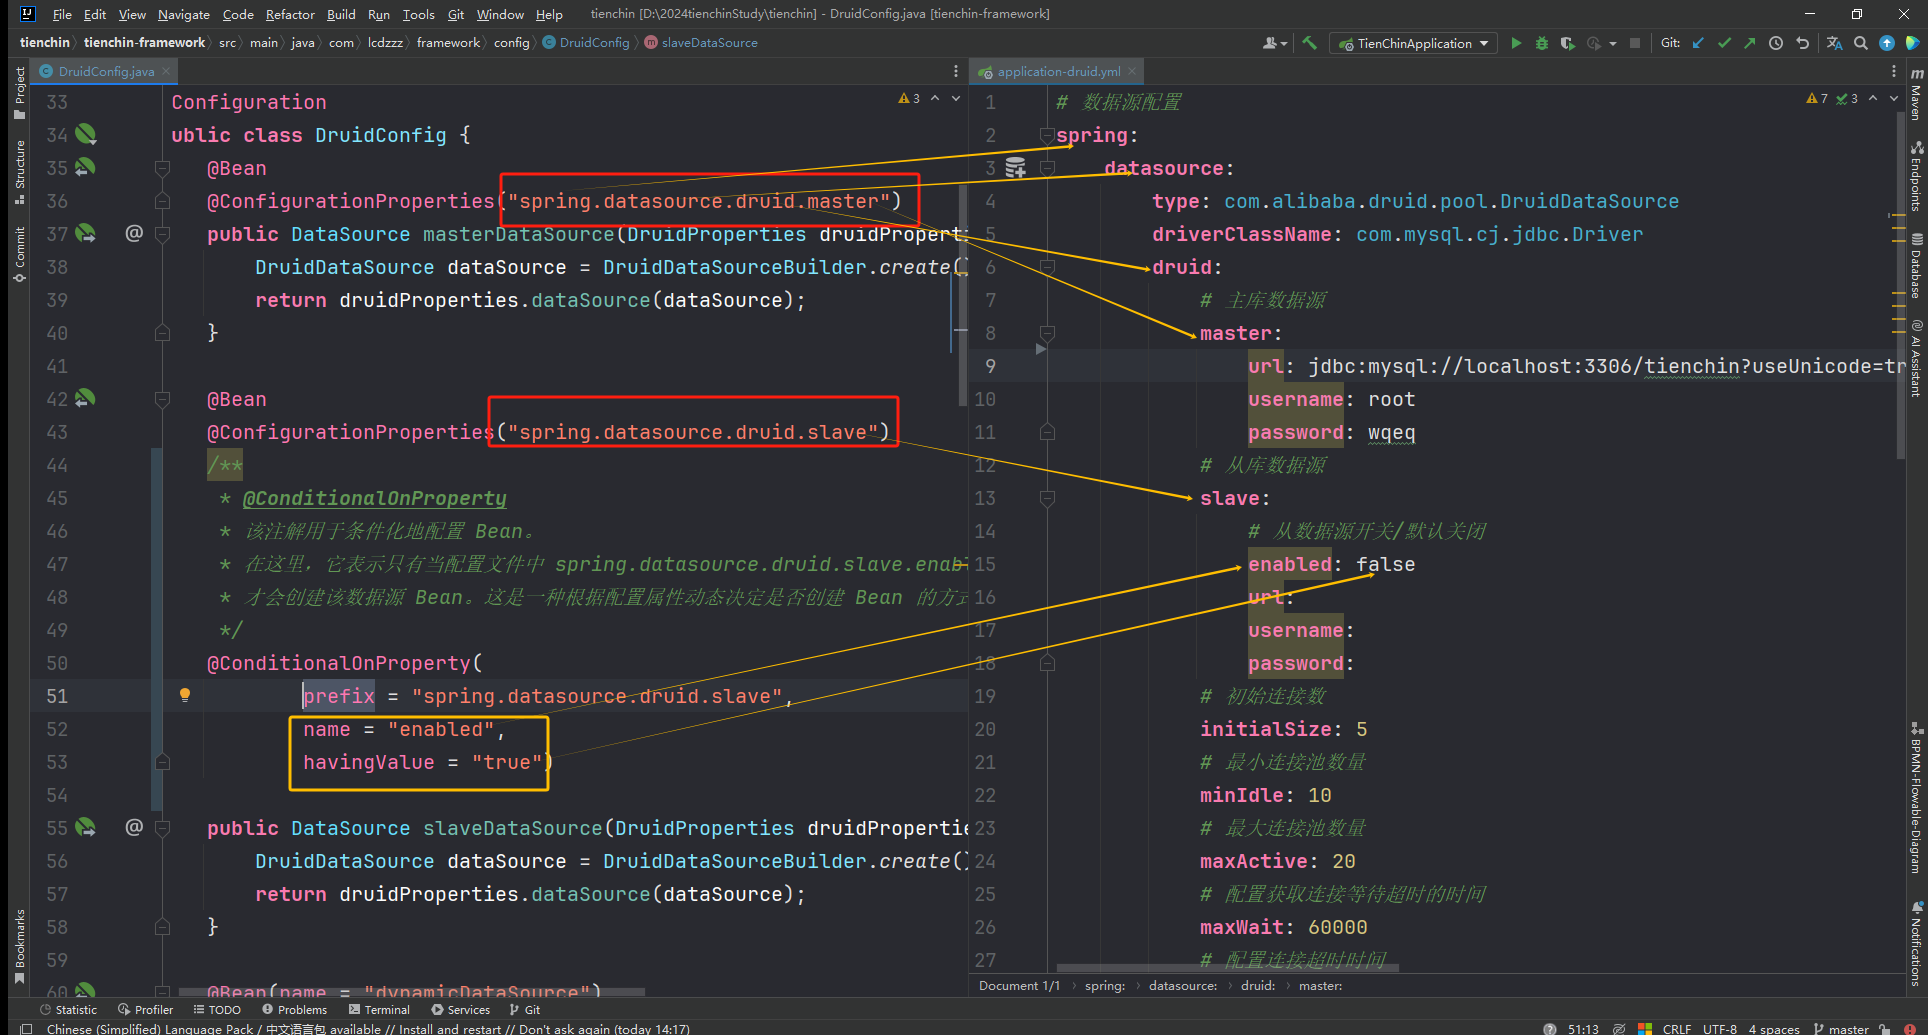
ruoyi脚手架的写法
联系如下
然后之前的写法是不用这样的,在步骤4中的DynamicDataSource中已经把所有的数据源读进来了【相比之下ruoyi写法没有这么灵活】
拓展:手动实现网页上切换数据源
步骤1:controller.DataSourceController
setDsType目的是打日志,真正有作用的是存在session里面的数据源名字
getAllUser为测试接口,测试数据源是否真的改变。方便起见,讲从数据库select出来的数据直接打印到控制台
1
2
3
4
5
6
7
8
9
10
11
12
13
14
15
16
17
18
19
20
21
22
23
24
25
26
27
28
29
30
31
32
33
34
35
36
37
38
39
40
41
| package com.lcdzzz.dd.controller;
import com.lcdzzz.dd.datasource.DataSourceType;
import com.lcdzzz.dd.model.User;
import com.lcdzzz.dd.service.UserService;
import org.slf4j.Logger;
import org.slf4j.LoggerFactory;
import org.springframework.beans.factory.annotation.Autowired;
import org.springframework.web.bind.annotation.GetMapping;
import org.springframework.web.bind.annotation.PostMapping;
import org.springframework.web.bind.annotation.RestController;
import javax.servlet.http.HttpSession;
import java.util.List;
@RestController
public class DataSourceController {
private static final Logger logger = LoggerFactory.getLogger(DataSourceController.class);
@Autowired
UserService userService;
@PostMapping("/dstype")
public void setDsType(String dsType, HttpSession session){
session.setAttribute(DataSourceType.DS_SESSION_KEY,dsType);
logger.info("数据源切换为 {}",dsType);
}
@GetMapping("/users")
public List<User> getAllUser(){
List<User> allUsers = userService.getAllUsers();
allUsers.forEach(System.out::println);
return allUsers;
}
}
|
步骤2:aspect.GlobalDataSourceAspect.java
和之前的DataSourceAspect一样,定义切面
【注】@Order值越小,优先级越高。但这里值得注意的是,优先级越低的,越后面执行;后面执行的,就能覆盖前面的。所以优先级越低的,才是最后真正起作用的那个。
这里定义的切点不是像之前的一样的在注解@DataSource上了。归根结底,手动实现网页上切换数据源关联的是一个service层的一个方法,所以切点应该设置如下。
环绕通知,拦截下来,设置最新(从session中)得到的数据源
1
2
3
4
5
6
7
8
9
10
11
12
13
14
15
16
17
18
19
20
21
22
23
24
25
26
27
28
29
30
31
32
33
34
35
36
37
38
39
40
41
42
43
| package com.lcdzzz.dd.aspect;
import com.lcdzzz.dd.datasource.DataSourceType;
import com.lcdzzz.dd.datasource.DynamicDataSourceContextHolder;
import org.aspectj.lang.ProceedingJoinPoint;
import org.aspectj.lang.annotation.Around;
import org.aspectj.lang.annotation.Aspect;
import org.aspectj.lang.annotation.Pointcut;
import org.springframework.beans.factory.annotation.Autowired;
import org.springframework.core.annotation.Order;
import org.springframework.stereotype.Component;
import javax.servlet.http.HttpSession;
@Aspect
@Component
@Order(10)
public class GlobalDataSourceAspect {
@Autowired
HttpSession session;
@Pointcut("execution(* com.lcdzzz.dd.service.*.*(..))")
public void pc(){
}
@Around("pc()")
public Object around(ProceedingJoinPoint pjp){
DynamicDataSourceContextHolder.setDataSourceType((String) session.getAttribute(DataSourceType.DS_SESSION_KEY));
try {
return pjp.proceed();
} catch (Throwable throwable) {
throwable.printStackTrace();
} finally {
DynamicDataSourceContextHolder.clearDataSourceType();
}
return null;
}
}
|
与此同时,为了让两种设置数据源的方法有合理的先后顺序,要在@DataSource直接上给11,在GlobalDataSourceAspect给10。达到的效果就是,全局,即先以全局手动设置的数据源为准,若某个service层的方法用了@DataSource注解,就以注解定义的为准
1
2
| @Order(11)
public class DataSourceAspect {
|
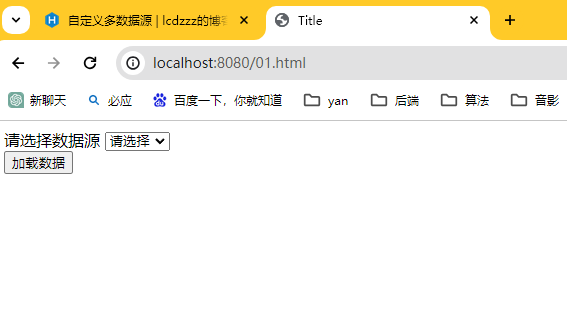
步骤3:简单写一个网页
loadData()是讲select出来的数据显示在网页上,但是不知道为什么我这里不行,应该是JSON转换的原因,不过这个不是本篇的重点,所以把它打印在控制台也行。
dsChange(value)是为了把选择的数据源名,打印出来。
1
2
3
4
5
6
7
8
9
10
11
12
13
14
15
16
17
18
19
20
21
22
23
24
25
26
27
28
29
30
31
32
| <!DOCTYPE html>
<html lang="en">
<head>
<meta charset="UTF-8">
<title>Title</title>
<script src="jquery-3.6.0.js"></script>
</head>
<body>
<div>
请选择数据源
<select name="" id="" onchange="dsChange(this.options[this.options.selectedIndex].value)">
<option value="请选择">请选择</option>
<option value="master">master</option>
<option value="slave">slave</option>
</select>
</div>
<div id="result" ></div>
<button onclick="loadData()">加载数据</button>
<script>
function loadData(){
$.get("/users",function (data){
$("#result").html(JSON.stringify(data));
})
}
function dsChange(value) {
$.post("/dstype",{dsType:value})
}
</script>
</body>
</html>
|
用jQuery,这里就不放上来了,而且因为是简单的用,直接把文件复制过来即可。jQuery地址:https://code.jquery.com/jquery-3.6.0.js
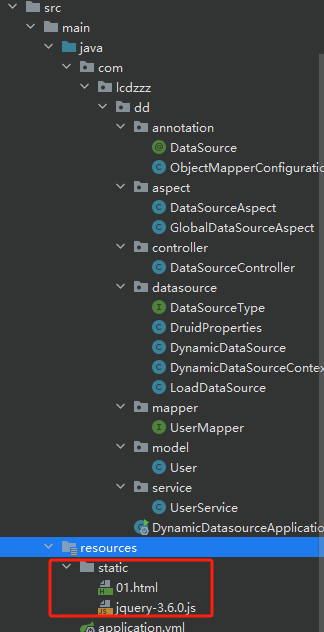
目录结构:
测试